Photoshop 32 Bits/Channel for Astro-Image Processing
Introduction
I was recently performing an in-depth analysis of some shortcomings of using Adobe's ACR raw converter as part of a correct DSLR astro-processing workflow.
Trying to find workarounds for these issues I accidentally stumbled across some remarkable properties of 32bit/channel mode in Photoshop (CS5, CS6 and CC versions).
The original critique of ACR can be found here: Critique of ACR for Astro-Image Processing
The rationale for using process version 2010 and then converting to 32bits/channel can be found here: Colour Correct Workflow
To briefly summarise, the default curve used by ACR causes colour saturation as scene intensity falls and subtracting light pollution from non-linear data has similar effects.
ACR process version 2010 is a purer implementation of the Adobe RGB constant gamma colour space and converting to 32bits/channel allows operations to be performed using linear data.
This web article looks further into what can be achieved in 32bit mode and how it can potentially be part of a full astro-processing workflow.
Disclaimer: I am still a strong believer in the traditional astro-processing workflow where raw darks, flats, bias are used to calibrate raw lights. However, for those imaging with lenses on a DSLR (or Mirrorless) camera, the ACR raw converter does offer definite advantages by performing vignetting corrections, chromatic aberration adjustements, noise reduction etc.
Important Settings in ACR
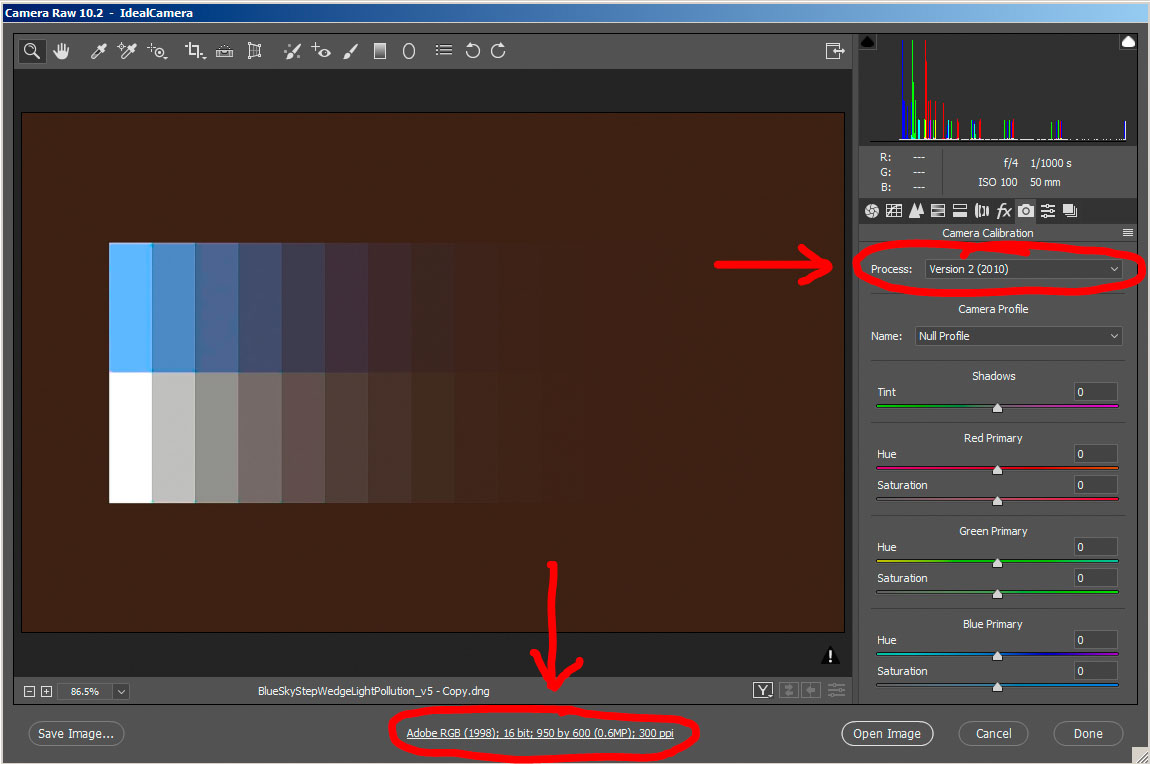
Everything in this article relies on the fact that some very important settings are used when opening raw files in Photoshop or exporting them as TIFFs using Lightroom/Photoshop/ACR. Here is a summary of those settings:
Photoshop (and Lightroom) take you into ACR for opening the file. It is very important to use exactly the following settings:
Now hit the "Open Image" button in ACR to view the image in Photoshop
 The rationale for this was explained here: Colour Correct Workflow but here is a brief summary:
The Remarkable 32 Bits/Channel Mode
When an image (or calibration flat) is opened in Photoshop it can be converted to 32 bit mode by performing the operation "Image -> Mode -> 32 Bits/Channel"
The little known fact about 32 bit mode is that the data values are now linear.
Importantly this means that skyglow can be subtracted from the image without causing colour saturation or bluing issues and also calibration flats can be correctly applied.
In other words, operations such as division by flats and subtraction of light pollution can be executed in a mathematically correct manner.
Photoshop Support Issue
Before going further I ought to point out that some people have a faulty installation of Photoshop. Photoshop CS5, CS6 and CC should all support using layers in 32 bits/channel mode.
If your version does not allow this then you should contact Adobe support. Here are some links that indicate the problems that some people experience:
https://feedback.photoshop.com/photoshop_family/topics/ongoing_saga_of_not_being_able_to_edit_32_bit_images_in_photoshop_cc
https://forums.adobe.com/thread/716157
https://forums.adobe.com/thread/1196860
Vignetting Corrections
Use lens profiles or divide by flat in 32 bit mode
Light Pollution Subtraction
Use subtractive layers
dark and bias subtraction - try subtracting a proportion
NOTES: Bias and darks have issues since light levels too low. NOTES: Photoshop support issue for 32bit NOTES: stacking data - export and import profiles
work around some of thoseWhile analysing remarkable properties of using 32 bits/channelThe traditional approach to astro-image processing is to calibrate raw exposures with bias, flats and darks. This approach works equally well with DSLR cameras and dedicated astro-cameras although in general few imagers are concerned with proper colour management. Calibrated DSLR exposures are then demosaiced (i.e. turned into colour), star aligned and stacked. Some kind of stretching (hopefully colour preserving!) is then required to make the faint structures visible.
In recent years, a modern approach to astro-image processing has been advocated, which uses the power of the raw converter and dispenses with the need for the bias, flat and dark calibration frames. The resulting colour exposures are then aligned and stacked.
The benefits of this modern approach are the following:
However, this spproach typically leads to flawed colouration in astro-images. These flaws were examined and explained in the following article:
Critique of ACR for Astro-Image Processing
Specifically in the shadow areas of the image two problems occur:
As I pointed out at the time, a proper understanding of the causes is the first step to designing a possible workaround. I have now discovered a colour correct method of processing using ACR which overcomes both the above problems.
A Brief Explanation of the New Processing Workflow
What follows is a brief description key principles behind the new processing workflow.
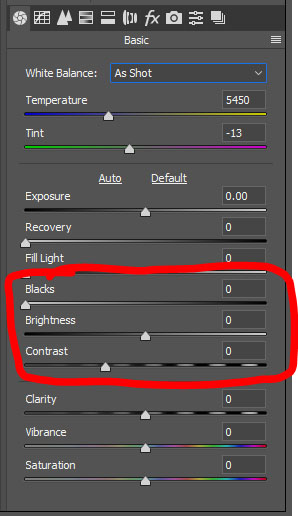
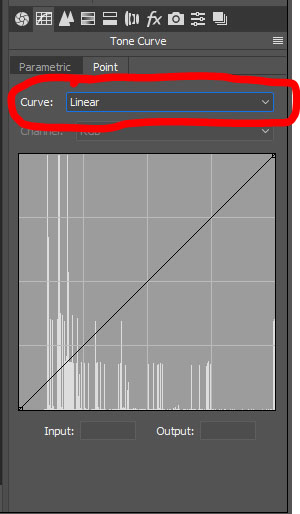
For those of you who have understood the arguments and explanations outlined in Critique of ACR for Astro-Image Processing, you will know that using ACR process version 2010 (with all sliders set to zero and the "Linear" tone curve setting) gives a well behaved constant gamma transfer curve for the Adobe RGB colour space all the way down to output values of around 20 or 25 (on a scale of 0-255) which is about 1/10 max value. At this point the curve transitions into becoming linear which is what causes the oversaturated colours in the shadows.
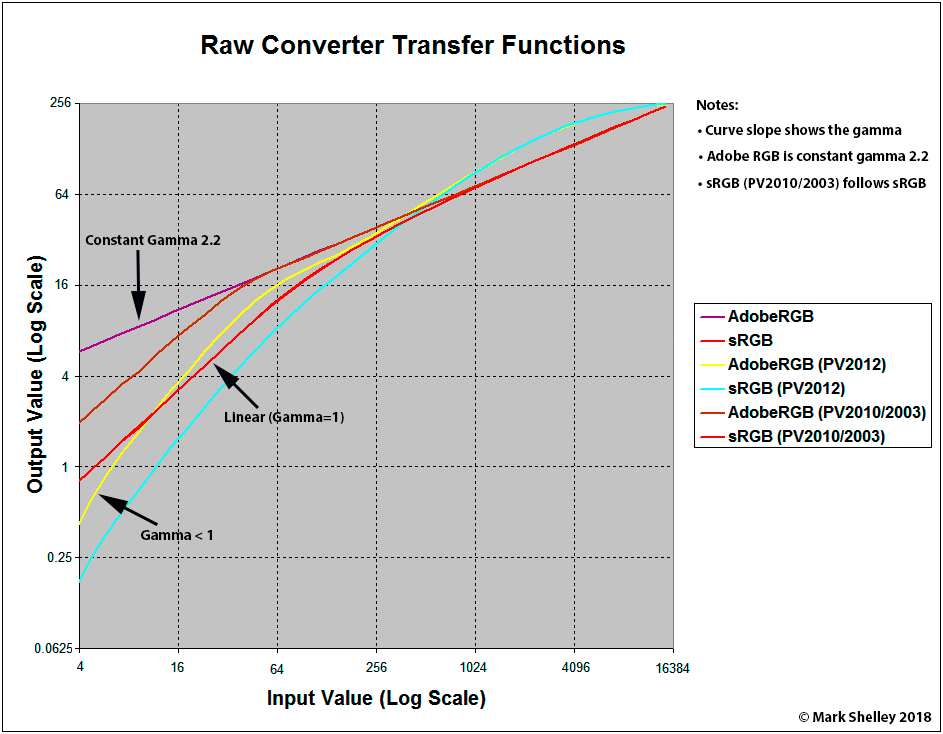
Figure 1 - Adobe Camera Raw Transfer Functions
Therefore if our image data puts the light pollution hump at least 1/10 from the left on the back-of-camera histogram then all the data will be sitting on the constant gamma=2.2 section of the transfer curve when we open the image using ACR. Typical astro-imaging recommendations are to have the sky glow peak at 1/4 or 1/3 from the left hand side, so this easily fulfils the 1/10 condition.
Within Photoshop, we could undo this gamma to give us back the original linear data. The light pollution offset can then be subtracted from this linear data. Afterwards, we re-apply tha gamma.
The resulting image should be free from the colour saturation and bluing issues.
The Remarkable 32bit Mode in Photoshop
Mathematically the idea above should work perfectly. But I didn't know if it would work in practice.
Experimentation showed it was difficult to remove the light pollution accurately enough in 16 bit mode after the data had "de-gamma" applied.
Switching to 32bit mode for greater acuracy, I accidentally discovered a very interesting property of 32bit mode:
In Photoshop 32bit mode, the image looks totally unchanged but there is an extraordinary difference in the RGB values.
In fact, in Photoshop 32bit mode the RGB values reported are linear. What is going on?
The answer is to do with colour spaces. The image data sitting in Photoshop is always in a known colour space. The most common ones used by the average user are sRGB and Adobe RGB. An identical colour represented by sRGB and Adobe RGB has differing RGB values in different colour spaces. You can see this happening if you perform the operation "Edit -> Convert to Profile". There are a huge number of possible destination spaces and in each of those colour spaces the colour will look identical (unless it is out of gamut) but the RGB values are different. These different RGB values display correctly on the screen because the colour management engine knows how to correctly interpret those RGB values for displaying on the screen.
Switching the mode to 32bit does something similar. Without informing the user, the colour space is changed to gamma=1.0, so the RGB values become different but the colour management engine knows how to interpret those new RGB values for displaying on the screen. Importantly, Gamma=1.0 means the RGB values are now the linear values.
Step by Step Description of the New Processing Workflow
For this description I will use the light polluted step wedge example that I created:
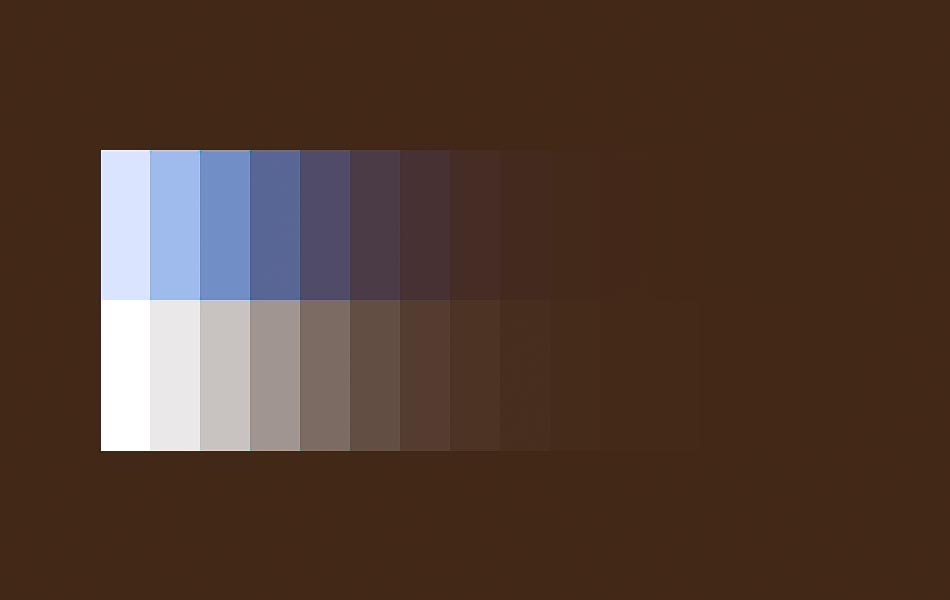
Figure 2 - Blue Step Wedge with Light Pollution (Adobe RGB image converted to sRGB for the internet)
The DNG file can be downloaded from: Google Drive Test Examples
I recommend you use it for following this tutorial. It is essential to use the original DNG file because the JPG representation is only 8bit.
Step 1: Open the file in Photoshop/ACR
Photoshop takes you into ACR for opening the file. It is very important to use exactly the following settings:
Now hit the "Open Image" button in ACR to view the image in Photoshop
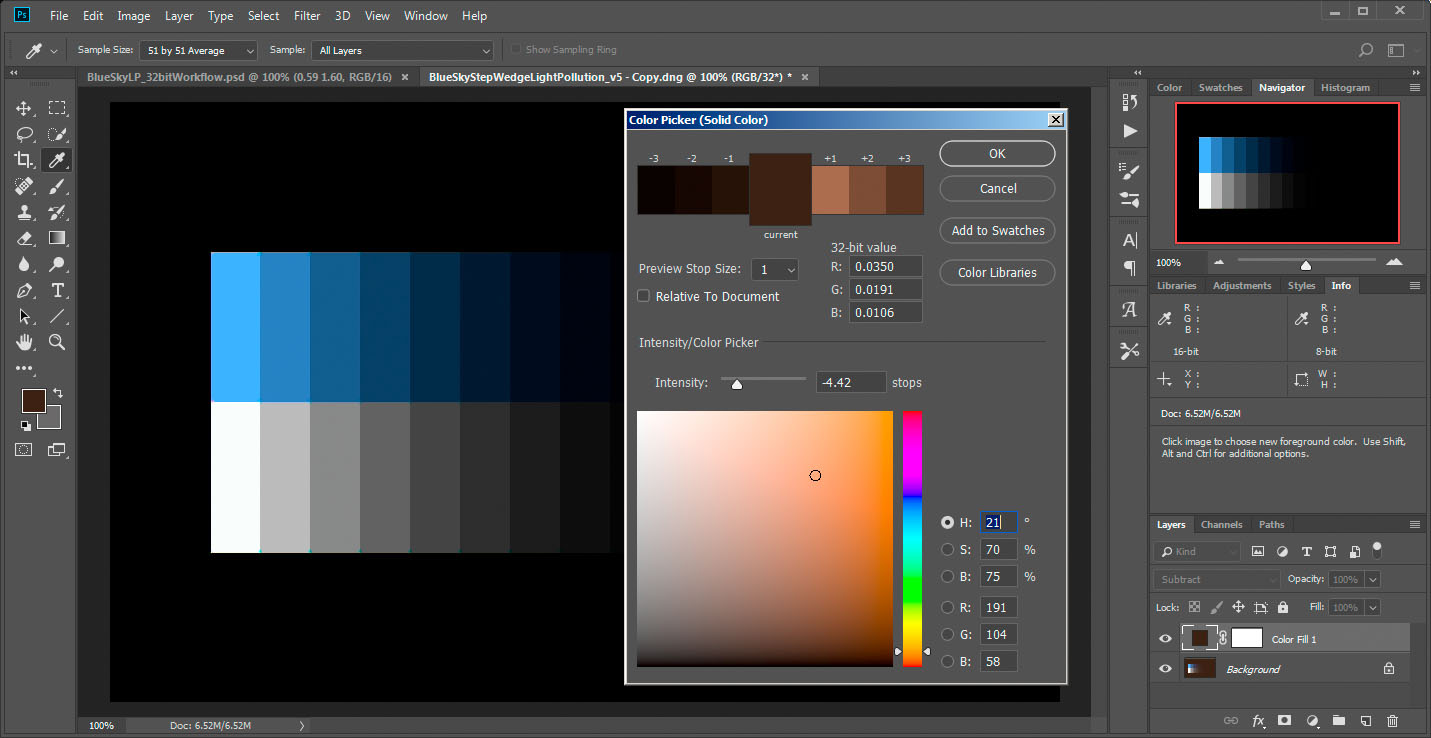
Step 2: Convert to 32bit mode
Use the operation "Image -> Mode -> 32 Bits/Channel"
Step 3: Subtract the light pollution
Subtracting the light pollution is potentially the most difficult step. It must be done in 32bit mode because 32bit mode is linear. Unfortunately you may find that your usual approach to subtracting light pollution is not available in 32bit mode because of the Photoshop limitations.
For the test image it is straightforward. Do it as follows:
Step 4: Convert back to 16bit mode

Step 5: Apply your favorite colour preserving stretch Now you are back in 16bit mode you can stretch the data to pull the faint details from the shadow areas. I recommend using a colour preserving stretch such as I described here: Photoshop Colour Preserving Stretch
The Blue Step Wedge Results
Note how well the above method has preserved the RGB colour ratios over a large dynamic range:

There is no bluing of the white step wedge and the colour ratios on the blue step wedge are maintained very well.
Final Comments
In the context of a complete processing and stacking workflow, the sequence of operations would be the following:
Hopefully you'll find this new processing workflow to be useful.
Useful Links
Critique of ACR for Astro-Image Processing
Photoshop Colour Preserving Stretch
Google Drive Test Examples
Page Last Updated: 4 March 2018